
Why tube amps?
This blog series covers some of the technical work underpinning Swanky Amp’s guitar tube amplifier model. It is structured to give musicians, producers and even technology enthusiasts an insight into the world of tube amplifier emulation.
The series is split into four parts:
- why tube amplifiers,
- why emulate a tube amplifier,
- how can a computer do emulation,
- and the approach taken in building Swanky Amp.
If you know too many guitarists, then you’ve probably heard of tube amplifiers spoken of with some degree of reverence. In this first post, you will read about what tube amplifiers do, and why otherwise normal people sound like manic cultists when talking about them.
Tube amplifiers are … well, amplifiers: they take a small guitar signal, and amplify it into a signal large enough to vibrate a speaker which can fill a room with ear-shatteringly loud rock and roll. Or just get on the nerves of every employee at a guitar store.
Signal here refers to the voltage created by the guitar. That’s right: when you hit the strings on an electric guitar you generate a (small) voltage. Connected directly to headphones, you could maybe hear a faint sound: the sound of the headphone’s speaker being pushed and pulled by that voltage. Connected to an amplifier, then to a larger speaker, you will hear the blissful sound of the electric guitar in all its glory.
At the time when electric guitars where first being built, tubes were found in all sorts of consumer electronics that needed to amplify a voltage. So it makes sense that guitar amplifiers were based on such tubes. But tubes do more than just amplify the signal, they also distort the signal when it exceeds the tube manufacturer’s recommended spec.
And we all know that rock stars definitely like to keep to recommended spec. So, as you can imagine, people started plugging guitars into amplifiers and pushing the tubes past the threshold for distortion (i.e. the signal coming out of the guitar is too large for the tube to amplify accurately). And so the sound of the electric guitar was born.
The astute reader might now be thinking: wait, you’re saying tube amplifiers have one job, to amplify a signal, fail at that, and this is what guitarists like about them? The answer is: yes, that’s right. It turns out guitarists like that distortion so much that amplifiers are now regarded as having two jobs: to amplify the signal and to distort the signal.
A small amount of distortion (sometimes called saturation) can make an instrument sound fuller, warmer, louder and generally more pleasant. A large amount of distortion can make an instrument … rock!!!
And so, this blog series is about how to get a computer (which can amplify a signal with near perfection) to replicate the same imperfections arising from tube amplification.
Part two explains why emulating tube amplifiers is something you might want do.
Why bother with emulation?
Part one introduced the concept of tube amplifiers.
The two biggest reasons (opinions may differ) for choosing emulation over the real thing are: volume, and cost. The cost aspect is pretty straightforward: tube amplifiers were never cheap to make, and even less so now that tubes are a bit of a novelty item. The volume aspect is a bit more involved.
In the previous post, you may have noted that the amplifier adds desirable distortion when the signal is large, which means when things are loud. In a live gig setting, as well as a studio recording setting, the guitar amplifier is recorded with microphones. That recorded signal is then played back through the venue PA system, or your home stereo speakers, at the desired volume.
In those situations, in order to get full range of tube distortion, the amplifier needs to be turned up to a loud enough level where the sound engineer at the pub will be glaring at you, or where your landlord will be evicting you (for those non-home-owning millennial guitarists). I’ll leave it to Tim Pierce to explain how he converted his garage into an isolation booth so he can record his amp with that sought-after distortion.
Emulating tube distortion, on the other hand, can be done at any level. So the final sound can be played at a volume that doesn’t violate city by-laws.
Readers who’ve played with amplifiers might be thinking: wait, but you can turn up the gain, and then turn down the volume, and get the distortion without bursting your ear drums. Yes, and no. You get distortion from the pre-amp but not from the power amp. Wait what?
There are roughly three parts to a “combo amp” (what most people think of as an amplifier): the pre amplifier, the power amplifier and the cabinet / speaker. The pre amplifier (or pre-amp) takes the guitar signal, runs it through a few tubes and increases its voltage. The power amplifier takes that amplified signal and adds more current to it so that it can deliver enough power to drive a speaker. Finally the cabinet / speaker is just that: a speaker mounted in a cabinet. The amplified signal is run to the speaker which, in turn, creates the actual sound. Suffice to know that there are two stages to amplification, and then a speaker is needed to create the sound.
And it turns out that the distortion / compression caused by the power amp (the one controlled by the volume knob, which makes things loud no matter what) is the one that guitarists will often describe with creative vocabulary choices such as note bloom.
Part three explains how a computer can be used to emulate a tube amplifier.
How can a computer do emulation?
Part two discussed the purpose of tube amplifier emulation.
By now you understand why tube amplifiers are coveted by guitarists (though you might not be lining up for a membership to that cult). And you understand that playing a guitar through a tube amplifier can be expensive because the equipment isn’t cheap, nor is eviction.
The next piece of the puzzle is to understand that a laptop can be used as a substitute for a tube amplifier. Tube amplifiers typically use a few tubes, let’s say about 5 tubes. A modern laptop, for comparison, has about 2 billion transistors. And each one of those is a bit like a tube. End of the story.
Well, not quite actually. But it turns out that if you add an audio interface (costs around $100, and plugs right into a USB slot) to a laptop, you can use it as a guitar amplifier. And you can play it out of any speaker at any volume. And the amplification is nearly perfect! None of that pesky distortion… oh right, that distortion is what we’re after.
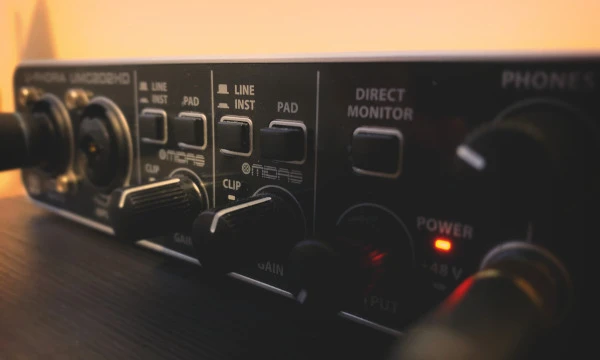
An audio interface at work.
So then why not just get a bad audio interface that introduces imperfections? The issue is that it won’t result in the same distortion as that created by a tube amplifier. You could try to make it imperfect in a way that sounds like a tube amplifier (which is effectively what solid state amplifiers do). While this can work, you will get only so far trying to emulate a tube with a handful of transistors. But, what if you had 2 billion transistors to work with…
That’s the idea behind software emulation: instead of trying to get a handful of transistors to act like a tube, billions of transistors are used to evaluate mathematical formula, and those formula are designed to emulate the behaviour of a distorted tube.

An overly verbose example of a formula used in digital signal processing.
If that sounds needlessly complicated and roundabout, well it kind of is. But given the availability and versatility of laptops, it’s pretty convenient. And what’s more, a laptop isn’t limited to emulating a single amplifier. It can emulate pretty well any amplifier, and the speaker, and the microphone, and the engineer moving sliders around in the control room…
To summarize the discussion so far: laptops can amplify a guitar signal, they can also use their vast computational power to transform that signal, and such transformations can be used to emulate tube amplifiers.
An overly simple approach to emulating amplifier distortion might be to clip the signal above a certain level. It is known that this is sort of what tube distortion does. And it sort of works: the clipping introduces harmonics in the signal, making it fuzzy. But it’s definitely not quite “the same” fuzz that you get from an amplifier. And the fuzz is fairly static as it doesn't change much in response to changes in the guitar signal.
You can try this for yourself: enter the following code into the FAUST editor. The code generates a sine wave at 440.0 Hz (A4), splits it in two, keeps one version as is, and clips the other at 0.5.
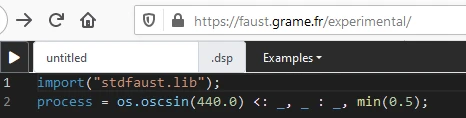
A very very simple amplifier emulation algorithm in FAUST.
You can see the resulting clipped waveform in yellow, while the original signal is shown in pink. The original frequency spectrum (also shown in pink) has a single peak at the sine's frequency. After clipping, many new frequencies are introduced in the spectrum (shown in yellow), resulting in a loud fuzz.
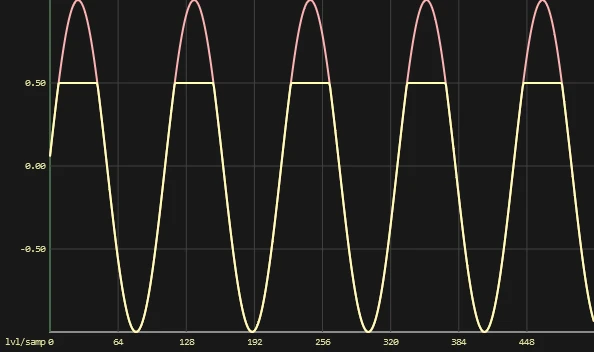
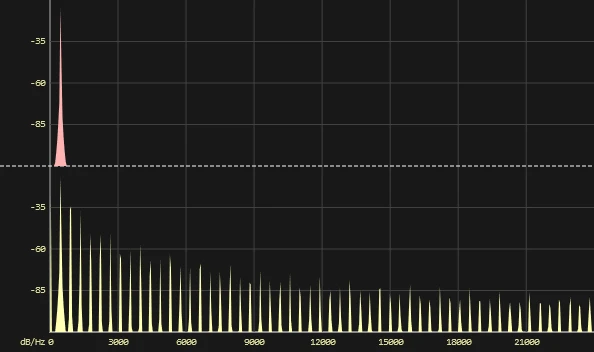
The sine wave and frequency spectrum before and after clipping.
A more sophisticated approach to emulation involves measuring the frequency profile of harmonics created by an amplifier (this is known as an impulse response). This is the basis of modelling amps and ensures you get “the same” fuzz as that generated by the amplifier.
However impulse responses have a significant drawback: they capture only a snapshot of the amplifier's sound. That is to say that they capture the response of the amplifier to a signal at a particular level. The snapshot can't know how the distortion should change in response to signals at different levels. This is fine for heavily distorted metal tones since the signal becomes so compressed that its level hardly changes. But for most other guitar tones, this approach falls flat on its face since it causes signals at all levels to have the exact same distortion (i.e. the distortion can't clean up).
It's possible to capture multiple such snapshots and use post-processing to recover some of the dynamics of the amplifier. While this is certainly a valid approach, it isn't perfect and can be a bit inflexible.
Part four explains the approach taken in building Swanky Amp.
Building Swanky Amp
Part three covered the concept of emulating tube amplifiers with a computer.
Time to put it all together. You now know that playing an electric guitar through a tube amplifier typically distorts the signal in a desirable fashion. You know that emulating a tube amplifier is great for keeping on good terms with your neighbours. And you know that laptops offer a convenient way to do that.
The problem boils down to finding algorithms which a laptop can use to reproduce the transformation a guitar signal undergoes as it passes through an amplifier. Two such algorithms were discussed in part three. Now it's time to look at what was done in building Swanky Amp.
Circuit simulation
A good place to start is with a schematic of a tube amplifier, which is effectively as detailed a mathematical description of that amplifier as you can get. In the case of Swanky Amp, a schematic closely resembling that of a Tweed Deluxe was used as a starting point. Clever people have written software which simulates the evolution of a signal in any part of such a schematic. In this way, the transformation of the guitar signal can be reproduced as accurately as the schematic (plus description of the tubes) allows. And those descriptions are quite accurate.
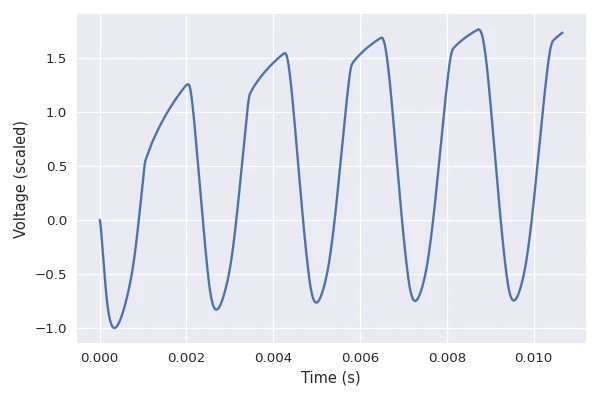
The following image shows the simulated outcome of an overdriven sinusoidal signal transformed by the first tube in the amp. The most visible effect is the clipping at the top of the waveform, but there's clearly a lot more going on. The waveform is inverted, it is shifting upward over time, the clip corners are rounded … The resulting distortion is quite different from that obtained with the hard clipping shown in part three. And the distortion will change over time as the level and shape of the clip changes.
A faster approach
It might then seem that the problem is solved: just pipe the guitar signal into the simulation! Except that while 2 billion transistors seems like a large number (and it is), the calculations required to simulate the circuit are so numerous that it takes a modern laptop a few seconds to simulate a few milliseconds of signal. This is highly problematic since the computer needs to be able process the signal at least as fast as you’re playing your guitar. And in fact, it should be much faster since your laptop also needs some spare transistors to keep doing normal laptop things (like streaming cat videos).
Attempt number two: the problem boils down to finding an algorithm which transforms a signal in a manner roughly equivalent to a tube amplifier, and which can be computed quickly. The approaches described in part three lean more towards the "roughly" rather than the "equivalent" side of things.
Will Pirkle's Designing Audio Effect Plug-Ins in C++ does a fantastic job of this. In his approach, the circuitry is broken down into groups of circuit elements, and C++ algorithms are written to emulate the transformation of the signal as it passes through each group. Then, by running the guitar signal through successive such algorithms, the overall amplifier transformation can be emulated.

An example of a group useful for analyzing how a triode transforms a signal.
A similar breakdown can be seen here. By analyzing the circuit around a tube and cross-referencing with manufacturer information, it's possible to mathematically describe how that portion of circuit is expected to transform the signal. Translating that mathematical description into a C++ algorithm is then fairly straightforward.
Recovering the detail
While this approach can lead to satisfactory results, some of the dynamic behaviours of tube amps are ignored. This is due to the fact that the groups are treated as independent of one-another. Whereas in reality, they are all contected in the same circuit and share some degree of coupling. This coupling is easily captured in the simulation, but is hard to work into the mathematical description of the individual groups.
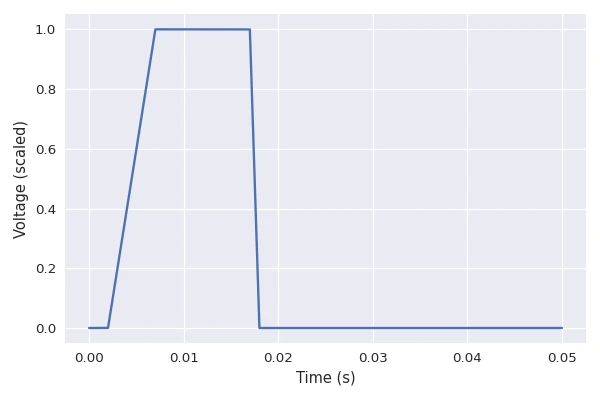
For example, the following two images show a pulse signal, and the resulting change of voltage on the plate of the first two tubes in the simulated amplifier. Such drift in the voltages can't be fully accounted for when treating the groups as independent. The drifting, while probably too slow to impact the spectrum of the distorted signal, will modulate various aspects of the distortion (think LFOs).
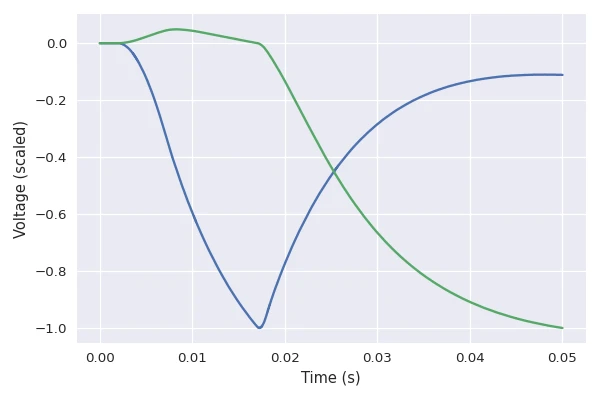
In practical terms: when a note is picked hard, voltages in the amplifier will drift leading to compression, release, and going as far as affecting the tone of what is played next. This leads to effects such as note bloom and sag where the amount of distortion and harmonic richness of the sound are affected by how loud the guitar is being played and has been played in the last few seconds (taken together these effects are often refered to as touch sensitivity).
The approach taken in building Swanky Amp can be summarized as follows: simulate the full amplifier circuit; create algorithms which have the right degrees of freedom to reproduce the observed transformations; and fit the parameters of these algorithms to match the simulation results.
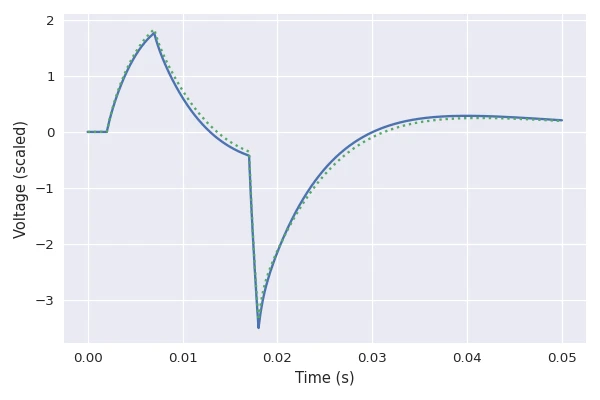
The following image shows the same pulse after it has been transformed by the first pre-amp tube. The blue line is the simulated signal, and the green dotted line is the signal obtained with Swanky Amp's algorithm. In order to correctly fit that shape, the algorithm has taken into account aforementioned voltage drift.
To summarize, Swanky Amp takes tube amplifier modelling a step further: it uses algorithms which capture the interplay of all part of an amplifier's circuit. And this means capturing the breadth of dynamics and touch sensitivity arising from tube amplifiers.